WordPress SEO plugin by Yoast is one of the most useful and 100% free plugins for WordPress blog. It is one of the complete SEO solutions for bloggers with many new features.
Although All in One SEO Plugin (AIOSEO) is also used by the bloggers, this plugin is considered as most SEO friendly, and alternatively will help to increase search rankings.
In this article, I will show you how to install and setup WordPress SEO Plugin by Yoast and what should you do if you have already installed another plugin.

Before proceeding, Let’s see why I have preferred this WordPress plugin…?
Why do we need to install an SEO Plugin?
From the beginning of my blogging, I have been using the AIOSEO WordPress Plugin, but when I installed the WordPress SEO Plugin by Yoast, I came to know some amazing features that can not be found in another plugin like AIOSEO.
So let’s have a look at them
- Focus on the targeted keyword and show its Keyword Density.
- Analyze the whole Post and show it how much it is SEO friendly
- Google search results snippet preview
- Meta Robots configuration, easy to add noodp, noydir meta tags.
- RSS Footer/Header Configuration
- XML sitemaps
- Breadcrumbs support, with configurable breadcrumbs titles.
- Pages or posts that have been noindexed will not show in XML sitemap (but can if you want them too).
- Ability to verify Google Webmaster Tools, Yahoo Site Explorer, and Bing Webmaster Tools
- .htaccess and robots.txt editor.
- Permalink clean-ups, while still allowing for Google Custom Search.
So after going through the above features, I am convinced to install and use this WordPress Plugin to make my blog Posts SEO Friendly.
How to Install and Set Up WordPress SEO Plugin by Yoast:
To get benefits from this plugin, first download this plugin. you can
- Go directly to the WordPress site and download the WordPress SEO Plugin by Yoast, and then upload it using your Dashboard > Plugins > Add New > Upload
- Go to Dashboard > Plugins > Add New > Search (WordPress SEO by Yoast )
When you have installed this Plugin then it is time to activate it. But remember that
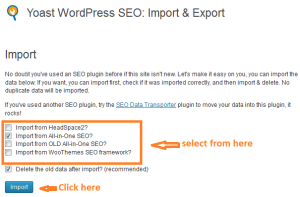
if you have not used any other plugin (like AIOSEO ) then you need not to worry if you have already using one then before deleting the older one you have to import all you previous data to new plugin so that your old posts may be shown with same description,tags etc,and you have no to face any difficulty.
How to Import Your Old data to the new WordPress Plugin:
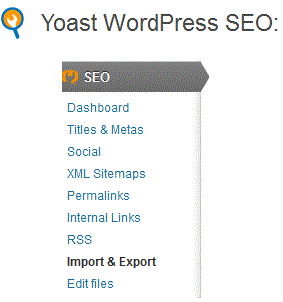
After installing the plugin, you will see an icon with title SEO, just click it and you will have all the options listed.
Now click on the import & export options and check your desired option.
1-Dashboard.
Under this option, you will find
- General: You can take a tour of that plugin and can also reset all options at any time.
- Tracking: By checking this, all the other plugin changes like redirect and no index will be sent to the author, I have unchecked it.
- Security: keep it checked
- Webmaster Tools: You can use Google, Bing webmaster tools and Alexa verification Id, so that your site may be listed by these.
after going through all the steps, click on the Save Settings.
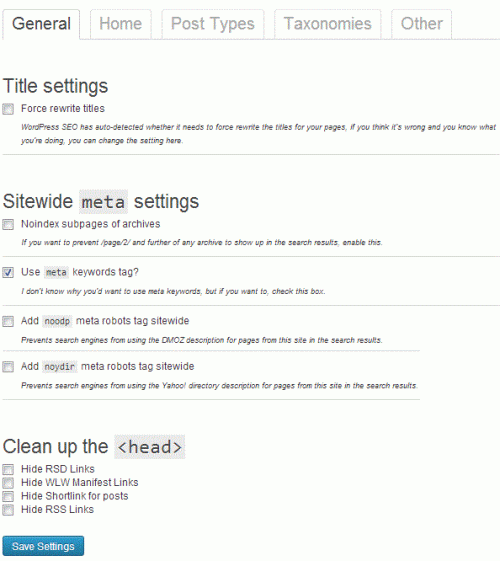
2-Titles & Metas:
This is the most important part of the plugin, including the following
- General: This includes Title settings,site-wide meta settings, and cleanup head. only check the use meta keyword tag option and leave others as it is and finally click save changes.
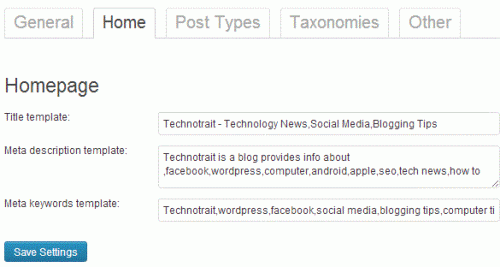
- Home: by default, it has these fields are pre-filled with title-template, but you have to define your own, so just as like in AIOSEO plugin, filled them properly so that the title, home description, and meta keywords can well explain your blog, it is also important because these settings will be later found by most of the search engines.
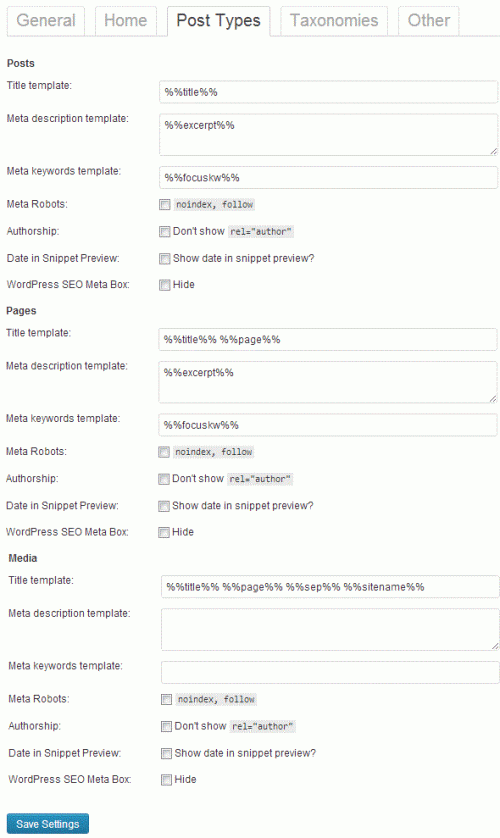
- Post Type: by default, WordPress comes with a lot of predefined settings like posts, pages, revisions, attachments, and navigation menus. user can also define their custom post type. It is also recommended to use the post title option and leave the description blank. also while writing new posts, use each post’s description; otherwise, the search engines will consider your general home page description.
- Taxonomies: If you do not have any description of categories, tags, or custom taxonomies, then it is recommended to leave this option as it is and move for next tab.
- Others: this option has author archives, date archives, and special pages, it is recommended to check both options of meta robots and leave other settings as it and then save it.
3-Social:
This option includes the settings for famous social media sites, so fill them in. It also has your home image URL and its description also fill it with the desired image, and if you do not want then, just leave it blank, and your default title will be used.
4-XML Sitemaps:
Yoast gives you the option to generate the XML sitemap; you can check it, but I recommend unchecking it and using the Google XML sitemap plugin.
5-Permalinks:
Permalinks are the URL both for the bots and visitors (but in most cases, bots), so you have to select them precisely.
You will see 6 checkboxes, just check the 5th box of Remove the ?replytocom variables and uncheck all other boxes.
while leaving the canonical settings as it is and click save settings.
6-Internal Links:
This section is not about the internal linking of your blog posts, but it is about the option of Breadcrumbs. You can use this option in the case to show site search results, giving your site an extra advantage in the search.
7-RSS:
In this, you will find two boxes. The one will show to Content to put before each post in the feed, and the second will show the content to put after each post. Just leave 1st option blank and confirm the second option has the lines containing:
The Post%%POSTLINK%% appeared first on %%BLOGLINK%%.
so save it.
8-Import & export:
You can use this option when you want to move from one SEO plugin to another.
9-Edit Files:
The last option will show the options of the Robots.txt and .htaccess files. This is my favorite portion (a little sensitive to cater) because you can edit both files without access to your database or c-panel (which can save a lot of time).
WordPress SEO plugin by Yoast for Single Posts and Pages:
The installation of the plugin is not sufficient, so the next and most important step is its proper use while creating a new post.
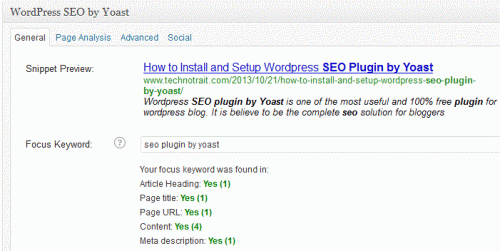
So while writing a new post, you will see the page name by WordPress SEO by Yoast, so just enter a proper SEO title, focus keywords, meta description, and meta keywords.
Hope so you will find the article useful while selecting the WordPress SEO plugin by Yoast. If you like the post and still have any query, then feel free to comment.
best SEO plugin ever
yes of course,because I’ve tried other also but found this one excellent.